
Sometimes I found myself scared to open these chamber walls for fear of what would topple on me. I spent days pinning organization and DIY. When one day I'd finally had it. I don't know if it was the semi-concussions from the cups that had fallen on me the many times before, or if it was my newfound love for DIY, but one day I opened my cabinets and started chunking cups like they were bad omens or something. I remembered a very cute DIY I'd seen before turning mason jars into cups with lids. Everyone with kids aged 9, 5 and. 2 knows the words "lids" is a very important word in our everyday language!!! With a quick google, I found what I needed. I bought two boxes of mason jars, 20 rubber grommets, a package of straws and some colorful duct tape and got to work.
I borrowed my husbands drill,... I've been begging for one of my own for weeks now, "no honey I don't want that new coach purse I'd like a drill and sander please," ;) here is a quick picture tutorial how I turned my cabinets from scary to simple!
Step 1: gather the necessary supplies

It took couple trial and errors so I will tell you what did and didn't work for me. At first I tried taking the lids off and drilling them on the cardboard. The hole was jagged and not circular. I also tried drilling them silver side up, which left jagged pieces in the inside of the cup which I didn't like either. Finally I discovered the best way was,...
Step 2: Leaving them in the box, turning the lid upside down and re-screwing the cap on.

Step 3: Drilling then with them in the box (hold with one hand I just am not pictured here doing that because I had to snap a picture ;) ) drill completely through making a nice round circle.

Step 4: Some jagged edges may be left around the top just hammer them down and they will flake off.

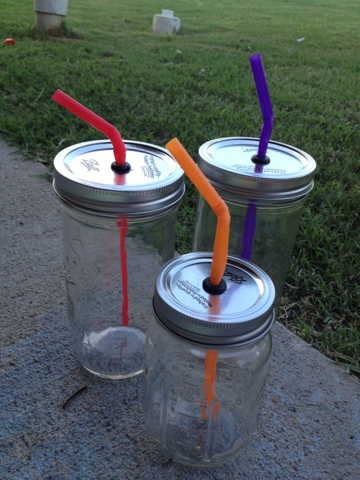
Step 5: Squeeze the rubber grommet down and wiggle it into the hole.

Step 6: Pinch and insert straws.
I will note that finding small rubber grommets are HARD! After numerous calls and searching I located them at Lowes in the hardware drawers! They sold them in packs of two for $1.09 a piece!!
Step 6: (optional) I also decided I wanted to spice my cups up a bit! So I bought some of this pretty turquoise waterproof duct tape from target! After embellishing make sure you hand-wash them really well since there will be small metal shards from the drilling.

This was a very fun, easy and cheap DIY! It wouldn't take but a couple hours to transform the inside of your kitchen cabinets from scary to simple!! Now every time I get a drink I can enjoy them in my mason jars like I used to when I was a kid!


No comments:
Post a Comment